Dark circles, we all have them. Whether you’re missing out on a precious night’s sleep or you’re just genetically inclined to have a darker shade under your eyes, sometimes we need a quick fix and a really good under-eye concealer to feel confident and refreshed.
This tutorial will give you the knowledge you need to look well-rested and fresh-faced every day.
With the recent launch of our Colour Correcting Bronzers (which basically do the colour correction work for you), our Director of Artistry Pablo Rodriguez takes us back to colour correction basics, giv
ing
a quick course in concealing dark circles under your eyes.https://www.youtube.com/watch?v=e7WTJdmguMw
STEP ONE: COLOUR CORRECTION BASICS
The aim of this look is to minimise dark circles for a fresh and glowy complexion. Start by adding two small layers of Cream Pigment in Androgen under the eyes, using your fingertips to gently finesse into the skin
,
focusing on the darker areas under the eyes. The warmth of this shade will conc
eal any blue or purple undertones under your eyes.If you’re looking for a quick fix, Antimatter Lipstickin Vela, a similar peachy pink shade, can be great to correct any under eye darkness in a pinch. One tip is to beware lipsticks with hydrating ingredients as these will move around the skin during wear.
STEP TWO: APPLY FOUNDATION AS USUAL
Blend out your foundation as usual without going over any of the pigment under your eyes.
A pro tip for applying foundation:
build your foundation look in layers. Use our fluffy Foundation Brush
to blend out in circular motions, starting in the middle of the face close to the nose and blending outwards.STEP THREE: CONCEAL UNDER EYES
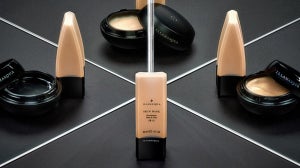
When it comes to choosing a
concealer,
you’ll want a shade that is a bit deeper to match your natural undertones.
Gently p
ack Skin Base Concealer over the Cream Pigment in very fine layers until you
r
reach your desired coverage.
Then, using the Concealer Brush, blend the edges of the concealer into your foundation.
You should not see a massive difference in
colour
from your foundation and
concealer
once they are
blended
together
.
STEP FOUR: SET & FINISH
Using our Pressed Powder, dust a fine veil over the look, locking each layer in place. For a healthy and flushed finish, use Colour Veil on the lips and cheeks to balance out the colour on your face then, finally, coat lashes in Masquara for a dramatic lash look. To really lock in your full makeup look and keep your makeup from moving, set it in place using our Hydra Setting Spray.